
Why I created the BOM Comparison Single-level
The Bill of materials (BOM)
During my working career I have worked in small and big companies. I have been involved in design work in all of them. At the end of the design of a machine the purchasing of the components must be fulfilled. A bill of materials (BOM) is usually created to facilitate the purchasing process. The BOM is an organised list of all the components that form of a machine and is used to facilitate the purchasing process. The BOM is organised so that the buyer has all the information that is needed to purchase every single component. This normally include:
- Part number
- Name of component
- Quantity
A BOM can also include a series of accessory information, like:
- Material
- Vendor
- Price
- Weight
- Appearance/Color
- Etc.
Every company usually personalises the elements of the BOM depending on the requirements needed for the specific field in which they operate. For example, a machinery company may have to know the vendor and the material, while a company which produces consumer goods may be interested in the color and the expected delivery time of a component.
In the last 15 years the industry has moved to the use of 3D CAD systems to assist the user in the mehanical design. These are very common now and most of the designers are probably using softwares like Pro Engineer, Creo, Inventor, Catia, SolidWorks or Solid Edge on a day to day basis. Differently from the 2D systems, 3D CADs associate each part with a series of properties. Some of them are physical properties (e.g. weight, volume, etc.) and are calculated automatically by the software, others (like name, material, vendor, etc.) are manually defined by the user.
When a machine assembly is completed the user can automatically export the BOM from the CAD software. From this point onwards there is a significant difference between companies. Big and middle-sized companies can afford expensive PdM softwares, which are used to track the full life cycle of a component, including costing and purchasing. These softwares are able to evaluate if there are any differences between 2 versions of the same assembly and automatically prompt the user to define how to proceed with components that have been modified.
Small companies are more likely to complete this process manually. Most of them will export the BOM and then manipulate it on Excel adding information which the CAD software cannot handle. This system works fine but shows some flows when modifications are made to the assembly in the middle of the project. Let's imagine a part quantity needs to be changed. What the designer will probably do is update the CAD to have the right number of components and then manually update that quantity in the Excel BOM. It's not difficult to imagine how doing this could lead to human errors, which could cost time and money. The alternative could be to re-export the BOM every time a modification is done. This guarantees that the newly exported BOM is up to date, but creates the problem of the reconciliation of the data derived from the CAD with the data only available on the BOM. This leads people to download the updated BOM and then compare it line by line with the old one to spot and update the differences. This process is better and safer than the previous, but also very long and tedious. The BOM comparison spreadsheet was created to simplify this process.
How the BOM Comparison Single-level spreadsheet works
The BOM Comparison Single-level spreadsheet compares two BOMs and creates a list showing the differences.
Using a custom interface the user selects the areas of the spreadsheet where the old and the new versions of the BOM are located. The user then indicates which column contains the quantity and which one contains a unique identifier. This is the code that uniquely identifies a part and is normally referred as the part number. The user can then select how the software will handle duplicate parts (parts which are in 2 different lines of the BOM but have the same part number). As a standard, when a part is shown more then once in the BOM, the two (or more) lines are joined and the quantities added. As an alternative, the user can require that the repeated parts are not automatically joined. In that case the BOM comparison tool will stop in case a duplicate is found and highlight it. Once the user has manually solved the issue it will be possible to proceed with the comparison. A final option that is given to the user is to define how the results are shown. Three alternatives are available:
- Alphabetical order: the old and new bom are shown side by side and ordered by part number. This option is the quickest to calculate.
- New BOM order: the old and new BOMs are show side by side and maintain the order that the new BOM had before the comparison. This is particularly useful if the user wants to copy the results of the comparison into the preexisting BOM spreadsheet and be assured that all the lines will match.
- Old BOM order: the old and new BOMs are show side by side and maintain the order that the old BOM had before the comparison. This is particularly useful if the user wants to copy the results of the comparison into the preexisting BOM spreadsheet and be assured that all the lines will match.
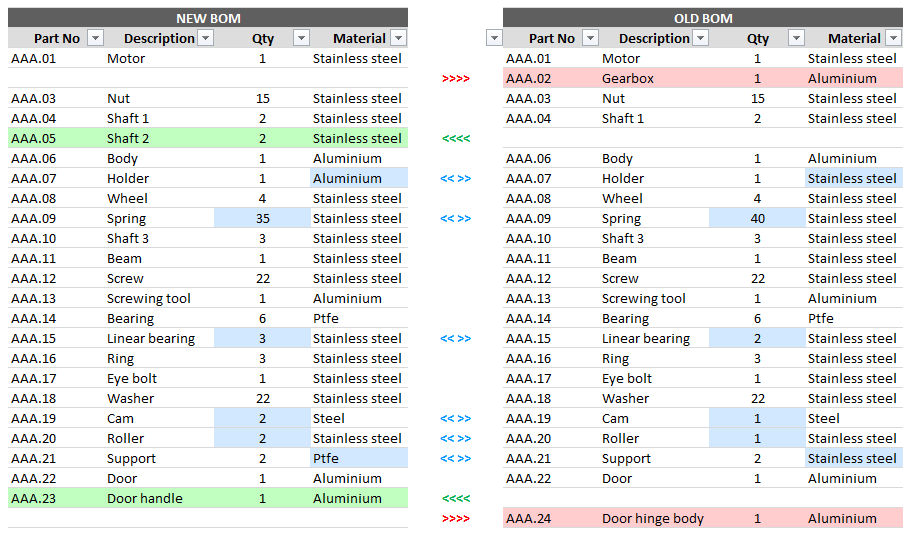
After this step the calculation can be started. This will take a few seconds. At the end of the calculation a new page is added to the spreadsheet showing the user the comparison of the two BOMs. Filters are automatically added at the beginning of each column, allowing the user to filter the page depending on the BOMs content and the results of the comparison. As an example, the user could be able to find all the components that have a quantity inferior than 10 and which are present in the new BOM but not in the old one.
Availability
The BOM Comparison Single-level tool can be downloaded as a spreadsheet and as an Excel add-in. The tool can be started by just clicking on the button and is ready to run in a few steps. Using the BOM Comparison Single-level spreadsheet will save you an incredible amount of time and hassle.
BOM Comparison Single-level spreadsheet release notes
Use
BOM Comparison Single-level spreadsheet and add-in can be tried for free for 15 days. After the trial period you will have to purchase a license to continue using the spreadsheet with full functionality.
Compatibility
BOM Comparison Single-level spreadsheet is tested on Microsoft Excel 2007, 2010, 2013 and 365 for Windows. Microsoft Excel for Mac is currently not compatible.
Activation
To activate the functionalities of the spreadsheet you may need to click on Enable editing and Enable content after opening it for the first time.
