
BOM Comparison Spreadsheet v2
BOM Comparison Spreadsheet v2 allows to automatically compare two BOMs and show the differences. It's a must-have for Engineers and draughtsmen.
Version: 2.8
Date of release: 08/09/2025
Compatibility: See release notes below
Getting started
Did you just download the BOM comparison for the first time? Then visit our Getting started page to learn how to install and use it.
License
BOM comparison can be tried for free for 14 days. After the trial period a license is needed to continue using the spreadsheet with full functionality. To see the pricing please visit the BOM comparison license page.
BOM comparison Single-level and Multi-level
The tool allows to compare Single-level and Multi-level BOMs. What is the difference between Single-level and Multi-level BOM?
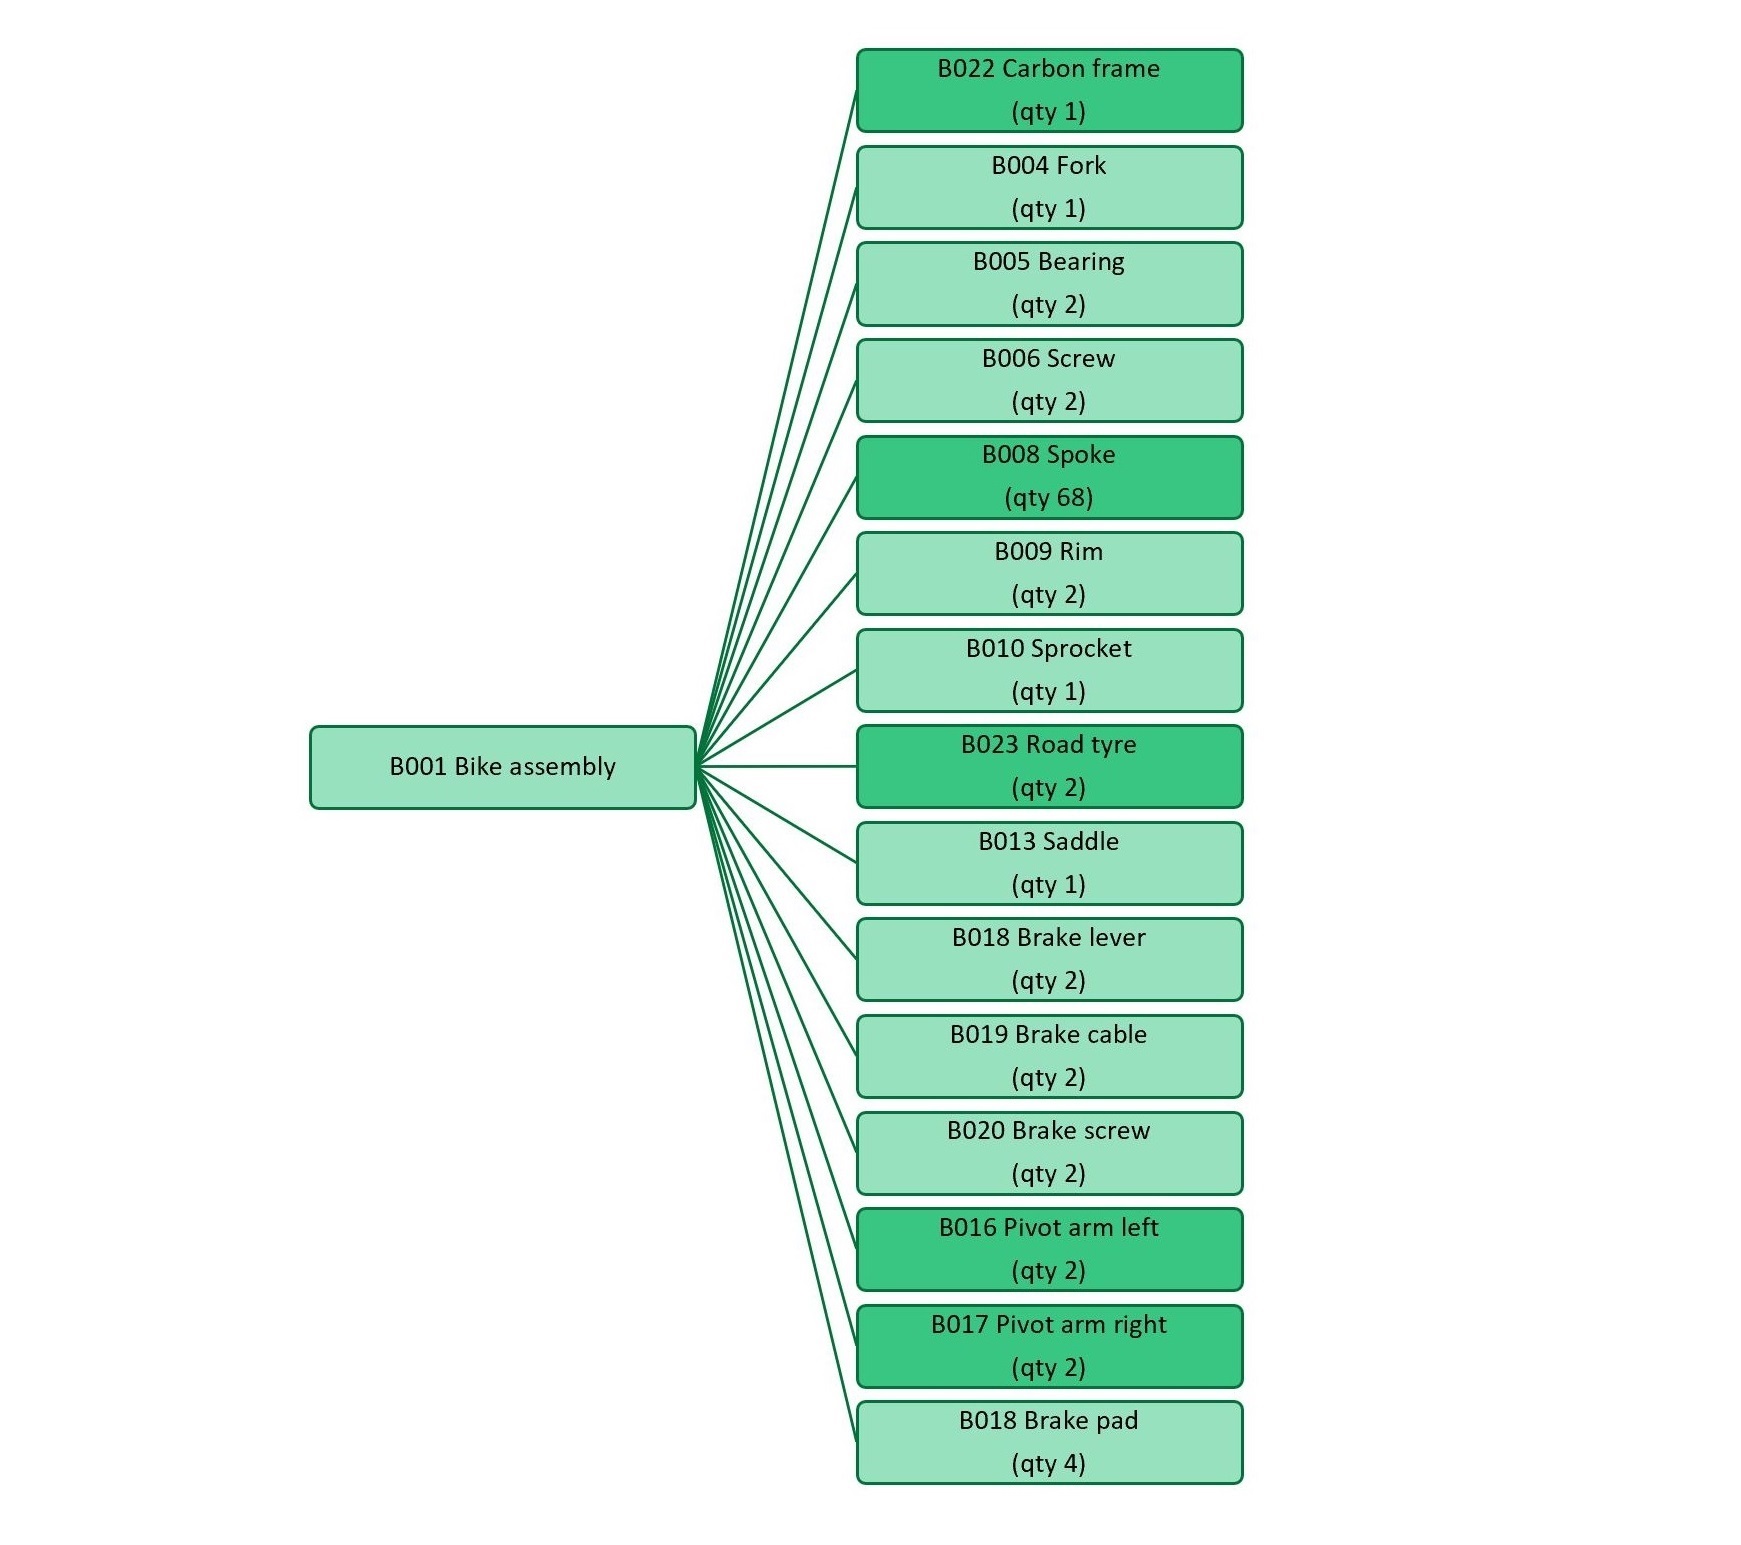
A single-level BOM (also called "parts-only BOM") only contains the fundamental components that form an assembly. Typically these are parts, fasteners, purchased components, etc. A Single-level BOM doesn't contain assemblies.
The components in a single-level BOM are shown in their total number, so they will only appear in the BOM once and their quantities will be added. For example, if a fastener is used in quantity 1 in a sub-assembly and in quantity 2 in another sub-assembly, it will appear once in the single-level BOM and it will have quantity 3.
An example of the structure of a Single-level BOM is shown below.
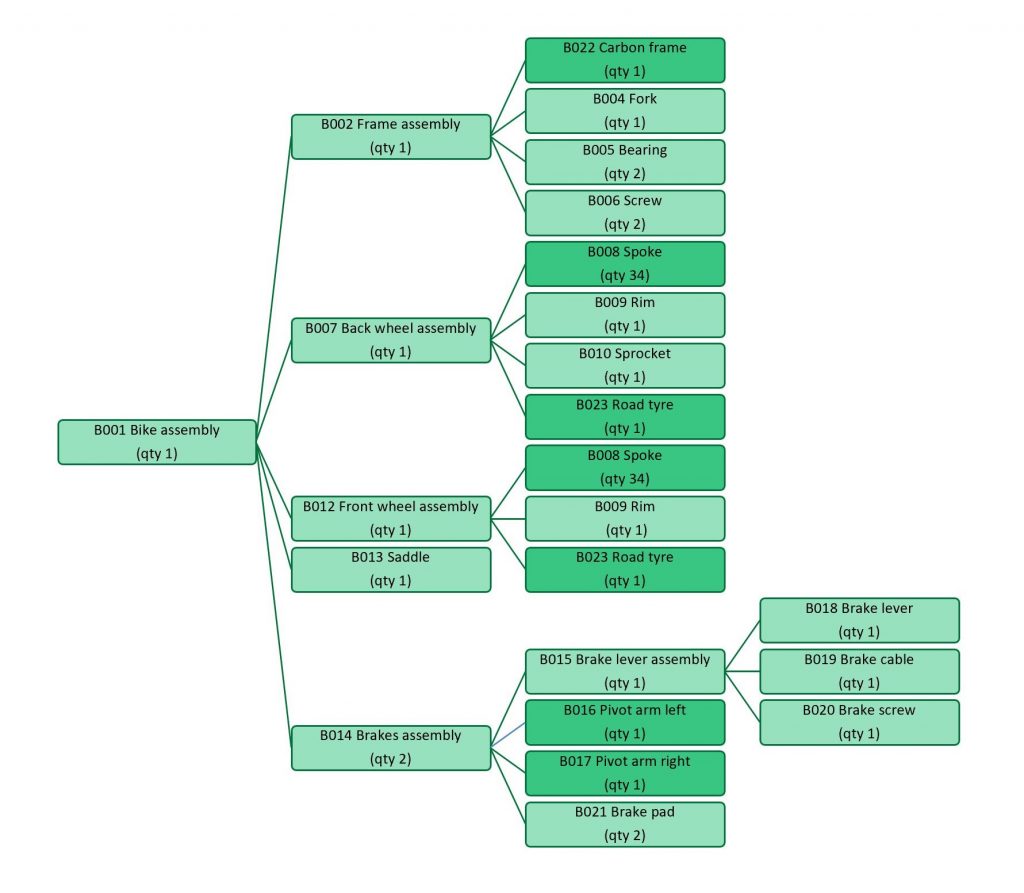
A Multi-level BOM (also called "structured BOM") contains the all the items that form an assembly. Typically these are assemblies, parts, fasteners, purchased components, etc.
All the items in a Multi-level BOM are shown in the position that they occupy in the assembly. For example, if a part and a fastener belong to a sub-assembly, they will appear in the BOM as children of the sub-assembly. Because of that, components can appear in a Multi-level BOM more than once, and each instance can have different quantities.
An example of the structure of a Multi-level BOM is shown below.
Why I created the BOM comparison tools
During my working career I have worked in small and big companies. I have been involved in design work in all of them. At the end of the design of a machine the purchasing of the components must be fulfilled. A bill of materials (BOM) is usually created to facilitate the purchasing process. The BOM is an organised list of all the components that form of a machine and is used to facilitate the purchasing process. The BOM is organised so that the buyer has all the information that is needed to purchase every single component. This normally include:
- Part number
- Name of component
- Quantity
A BOM can also include a series of accessory information, like:
- Material
- Vendor
- Price
- Mass
- Appearance/Color
- Etc.
Every company usually personalises the elements of the BOM depending on the requirements needed for the specific field in which they operate. For example, a machinery company may have to know the vendor and the material, while a company which produces consumer goods may be interested in the color and the expected delivery time of a component.
In the last 15 years the industry has moved to the use of 3D CAD systems to assist the user in the mehanical design. These are very common now and most of the designers are probably using softwares like Pro Engineer, Creo, Inventor, Catia, SolidWorks or Solid Edge on a day to day basis. Differently from the 2D systems, 3D CADs associate each part with a series of properties. Some of them are physical properties (e.g. mass, volume, etc.) and are calculated automatically by the software, others (like name, material, vendor, etc.) are manually defined by the user.
When a machine assembly is completed the user can automatically export the BOM from the CAD software. From this point onwards there is a significant difference between companies. Big and middle-sized companies can afford expensive PdM softwares, which are used to track the full life cycle of a component, including costing and purchasing. These softwares are able to evaluate if there are any differences between 2 versions of the same assembly and automatically prompt the user to define how to proceed with components that have been modified.
Small companies are more likely to complete this process manually. Most of them will export the BOM and then manipulate it on Excel adding information which the CAD software cannot handle. This system works fine but shows some flows when modifications are made to the assembly in the middle of the project. Let's imagine a part quantity needs to be changed. What the designer will probably do is update the CAD to have the right number of components and then manually update that quantity in the Excel BOM. It's not difficult to imagine how doing this could lead to human errors, which could cost time and money. The alternative could be to re-export the BOM every time a modification is done. This guarantees that the newly exported BOM is up to date, but creates the problem of the reconciliation of the data derived from the CAD with the data only available on the BOM. This leads people to download the updated BOM and then compare it line by line with the old one to spot and update the differences. This process is better and safer than the previous, but also very long and tedious. The BOM comparison spreadsheet was created to simplify this process.
General instructions
| Operation | How to |
| How to start the BOM comparison tool (spreadsheet version) | Single-level: Click on "Run Single-level BOM comparison" button in the sheet "Single-level BOM". Multi-level: Click on "Run Multi-level BOM comparison" button in the sheet "Multi-level BOM". |
| How to start the BOM comparison tool (add-in version) | Single-level: Click on "Run Single-level BOM comparison" button in the add-in bar. Multi-level: Click on "Run Multi-level BOM comparison" button in the add-in bar. |
| How to select the old BOM | Start the BOM comparison tool. Click on the button under "Select the OLD bom range (including titles):". Select the cells where the old BOM is. The titles must be included in the selection and must occupy the first row. Do not select empty cells or entire columns. |
| How to select the new BOM | Start the BOM comparison tool. Click on the button under "Select the NEW bom range (including titles):". Select the cells where the new BOM is. The titles must be included in the selection and must occupy the first row. Do not select empty cells or entire columns. |
| How to launch a comparison | Start the BOM comparison tool. Select the old and the new BOMs. Click on "Next -->". From the dropdown menus select the name of the columns that contain: - Unique identifier: this is the part number, which must be unique for each part. - Quantity: this is the quantity of the part. - Level: this is the level at which the part is located. This is not always needed (it depends on the type of comparison). Click on "OK". |
Single-level BOM comparison instructions
| Operation | How to |
| How to define the order in which results will be displayed | Open the BOM comparison tool. Click on "Settings" button. Select one of the options in the area marked "Results order?": Alphabetical order: results are ordered alphabetically by the unique identifier column. Old BOM order: results are ordered following the order of the NEW BOM. This is preferred if you want to refer to the NEW BOM to analyze the results. New BOM order: results are ordered following the order of the OLD BOM. This is preferred if you want to refer to the OLD BOM to analyze the results. |
| How to define if duplicate parts (parts that appear more than once in the BOM) will be automatically combined. | Open the BOM comparison tool. Click on "Settings" button. Select one of the options in the area marked "Automatically combine duplicate parts?": Yes: parts that appear more than once in the BOM are combined. This means that the duplicate parts will be shown only once, and the quantity shown will be the sum of all the quantities of the parts that have been recombined. No: if a part appears more than once, a message is shown to the user. The user can manually remove the duplicate parts. |
Multi-level BOM comparison instructions
| Operation | How to |
| How to define the order in which results will be displayed | Open the BOM comparison tool. Click on "Settings" button. Select one of the options in the area marked "Results order?": Old BOM order: results are ordered following the order of the NEW BOM. This is preferred if you want to refer to the NEW BOM to analyze the results. New BOM order: results are ordered following the order of the OLD BOM. This is preferred if you want to refer to the OLD BOM to analyze the results. |
| How to indicate how the level is defined in the input BOM | Open the BOM comparison tool. Click on "Settings" button. Select one of the options in the area marked "Level indicator of the input BOM": Number: Level is defined by a number. For example, the top level of the assembly has Level = 1, all its children have Level = 2, all its grandchildren have Level = 3, etc. Index: Level is defined by an index, which is a number where different levels are separated by an Index separator. For example, if the Index separator is a point '.', then: - The top level of the assembly has Level = 1 - Its children have Level 1.1, 1.2, 1.3. - All the children of 1.2 have level 1.2.1, 1.2.2, 1.2.3, etc. Group: Grouping is an Excel function under the tab 'Data' --> 'Outline'. Groups are visible by a series of '+' and '-' symbols at the left side of the screen. When you click on the '+' symbol, the children of a part are shown. When you click on the '-' symbol, the children are hidden. |
| How to compare the BOMs of 2 components that have a very similar BOM, but have different unique identificator (= different item ID) | Open the BOM comparison tool. Click on "Settings" button. Select one of the options in the area marked "Ignore first item?": Yes: ignore the first item. The unique identifier or the first line of the BOMs will be marked with a wild card so that the comparison will not highlight their difference. No: do not ignore the first item. If the 2 main parents are different, the comparison will mark that as a difference. |
| How to multiply components quantity by their parent quantity | Open the BOM comparison tool. Click on "Settings" button. Select one of the options in the area marked "Multiply quantity by parent quantity?": Yes: the quantity of each child is multiplied by the quantity of its parent. For example, if the parent has quantity 3 and its child has quantity 5, the child will be shown with quantity 15 (= 3x5). No: quantities are left as they are in the input file. |
| How to add indentation to the levels in the results page (to facilitate the reading of the results) | Open the BOM comparison tool. Click on "Settings" button. Select one of the options in the area marked "Show level indentation?": Yes: levels are shown with an indentation based on the level. The top level has a smaller indentation than the second level, the second level has a smaller indentation than the third level, etc. No: All levels are shown in the same way. |
| How to add grouping to the results | Open the BOM comparison tool. Click on "Settings" button. Select one of the options in the area marked "Group results?": Yes: results of the comparison are grouped. No: results of the comparison are not grouped. |
Features
- BOM selection
- BOM can be selected from different locations/spreadsheets
- No BOM size constraints
- Automatic verification of BOMs congruence
- Single-level and Multi-level BOM comparison
- Duplicates analysis (only on Single-level comparison)
- Duplicate components are automatically added
- If preferred, the user has the option to be notified if there are duplicate parts
- BOM comparison
- Automated BOM comparison
- Results display order: alphabetical (on Single-level comparison), old BOM and new BOM order
- Different options for level field (only on Multi-level comparison)
- Possibility to compare 2 items with different item ID (only on Multi-level comparison)
- Possibility to multiply items quantity by parent quantity (only on Multi-level comparison)
- Display of results
- Results automatically formatted
- Results can be filtered
- Add-in for Excel available
Availability
The BOM comparison tools can be downloaded as a spreadsheet and as an Excel add-in. The tools can be started by just clicking on the button and are ready to run in a few steps. Using the BOM comparison spreadsheet will save you an incredible amount of time and hassle.
Compatibility
BOM Comparison v2 is tested on Microsoft Excel 2013, 2016, 2019, 2021 and 365 for Windows. Microsoft Excel for Mac is currently not compatible.
Terms of use
The following terms of use apply to this spreadsheet:
Disclaimer
Although the author has attempted to find and correct any bugs in the spreadsheet, the author is not responsible for any damage or losses of any kind caused by the use or misuse of the spreadsheet.
The author is under no obligation to provide support, service, corrections, or upgrades to the spreadsheet.
For more information, please contact me.
Any comments?
If you have any comments on this material I’ll be happy to receive your feedback. You can contact me here.
If you enjoy this but would like to have it customised for your needs feel free to contact me.